How-To: Django on NearlyFreeSpeech.NET
Now that our persistent process feature is out of beta, this is the first in a series of brief tutorials designed to show how to make use of the feature. In this example, we’ll deploy a minimal Django site using WSGI. Although a lot of this is specific to Django, it also demonstrates most of the steps you would use with other frameworks, like Node.JS or Ruby on Rails. (And we’ll be adding how-to articles for those in the future.)
Getting your site ready for Django
First, create the site. When you get to the, “Server Type” panel, select the “[Production] Apache 2.4 Generic” option.
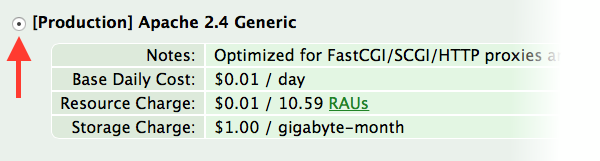
(You can also use the “[Production] Custom” option; it’s faster if you want Django to serve the whole site, but in this example, we’re also going to demonstrate how to let our Apache server handle a directory of static images.)
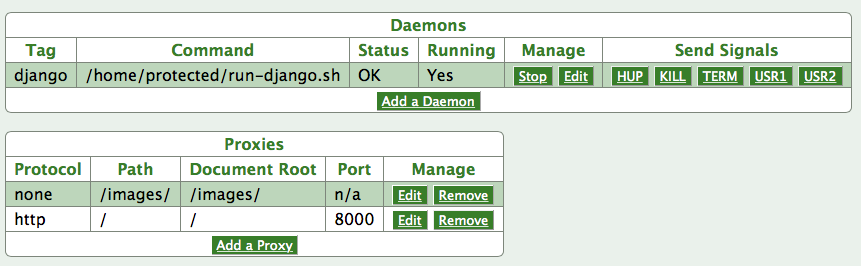
Once that’s done, you’ll immediately notice the new “Daemons” and “Proxies” boxes on the site info panel:
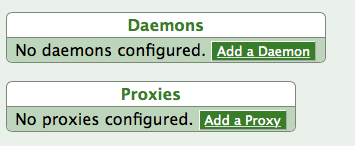
but you can ignore those for now. We’ll get back to them.
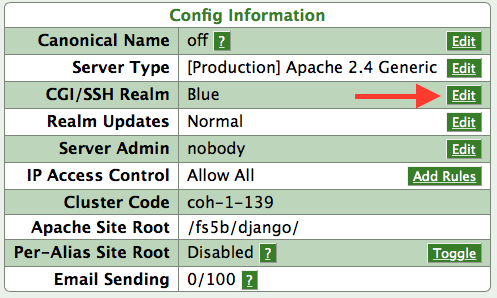
If it’s still 2014 when you read this, our base Django environment hasn’t been around very long, so it hasn’t had time to work its way into the default realm for new sites. (That’ll be happening in January 2015, so if you’re reading this in the future, you may be able to skip this step. Also, hello future, please send lotto numbers!) So for now you’ll need to update your site realm to indigo or white to get the newest code. Just click the “Edit” button on the “CGI/SSH Realm” line of your site’s Config Information box:
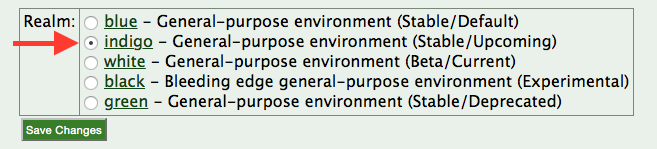
And choose the “indigo” or “white” realm. For this article, we’ll use the indigo realm:
Install Django via ssh
Next, log into the ssh server to set up the actual Django app.
$ ssh jdw_django@nfsnssh
[django /home/public]$ mkdir images
[django /home/public]$ cd /home/protected
[django /home/protected]$ mkdir django
[django /home/protected]$ cd django/
Operations to perform:
Apply all migrations: admin, contenttypes, auth, sessions
Running migrations:
Applying contenttypes.0001_initial... OK
Applying auth.0001_initial... OK
Applying admin.0001_initial... OK
Applying sessions.0001_initial... OK
[django /home/protected/django]$ cd ..
If you were expecting a bunch of stuff here involving Python’s virtualenv feature, you can totally do that if you want. It’s handy if you need a bunch of python modules we don’t provide. We don’t need it for this article, but if you need it, you probably already know what it is, how it works, and where to insert it into the steps above.
Next, we need a run script. A run script is how our system starts your daemon. You can use it to customize command line arguments and environment variables (or to jump into a Python virtualenv) before your daemon starts. The main thing to be aware of with run scripts is that they need to run the actual daemon in the foreground, which can sometimes be tricky. But that’s how Django rolls anyway, so we won’t have any problems there.
You can use whatever text editor you want to create your run script. (Just make sure if you create it on Windows that it winds up with Unix line endings.) Ordinarily I would use the one true editor (vi) at this point, but the run script is very simple and vi isn’t photogenic, so we’ll just enter it directly:
[django /home/protected]$ cat >run-django.sh <<NFSN_FEEL_THE_POWER
> #!/bin/sh
> exec python manage.py runserver
> NFSN_FEEL_THE_POWER
[django /home/protected]$ chmod a+x run-django.sh
At this point, django is pretty much set up. If you want to prove it, you can try running it from the command line:
[django /home/protected]$ cd django/
[django /home/protected/django]$ ../run-django.sh
Performing system checks...
System check identified no issues (0 silenced).
November 16, 2014 - 21:36:18
Django version 1.7, using settings 'helloworld.settings'
Starting development server at http://127.0.0.1:8000/
Quit the server with CONTROL-C.
Now, the ssh server is a restricted environment, so you can’t access anything running there from anywhere but there. So we can open another ssh window to check it out:
[django /home/public]$ curl -i http://localhost:8000/
HTTP/1.0 200 OK
Date: Sun, 16 Nov 2014 21:39:04 GMT
Server: WSGIServer/0.1 Python/2.7.8
Vary: Cookie
X-Frame-Options: SAMEORIGIN
Content-Type: text/html
<!DOCTYPE html>
... blah blah blah ...
<h1>It worked!</h1>
<h2>Congratulations on your first Django-powered page.</h2>
... blah blah blah ...
Looks good! So now we can close the second ssh window, and go back to the first one where we’ll see our footprints:
[16/Nov/2014 21:39:04] "GET / HTTP/1.1" 200 1759
From there, follow the instructions to quit the server (hit CONTROL-C). But leave this ssh session around. We’ll come back to it later.
Now, we’ve got to tell our system about Django, so it will get started (and if ever necessary, restarted) Back to the UI!
Telling our system about Django
First, we’ll add a Daemon for Django from the Site Information panel in the member interface:

Shocking no-one, this will need some configuration:
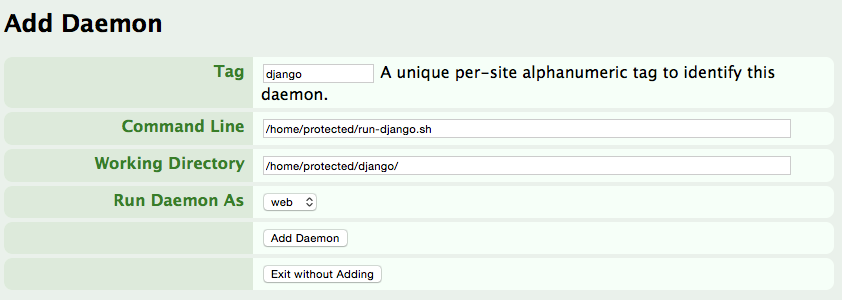
The tag is just a short name for the daemon. Tags are unique on a per-site basis, so everybody can have a django of their very own, but only one per site. (If for some reason you needed another, there’s nothing wrong with django2.) It’ll also need to know the name of the run script we created and where to run it from. In this case, we want to be inside the Django directory so when the run script will be able to find manage.py. And we run it as the web user, which is what you should always do for a daemon that serves web pages. (Other types of daemons, like custom databases, should probably run as “me.”)
Next, we’ll have to add two proxy entries, one to send most of the site’s traffic to Django, and one to exclude some static files we don’t want Django to handle.
The first proxy entry will send most of the site’s requests to Django. It’s added from the Site Information Panel:

And configured like this:
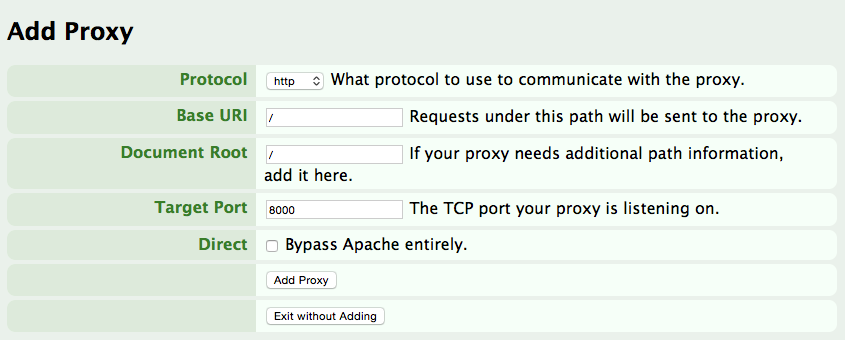
Python takes care of mapping HTTP to WSGI for us, so this is an HTTP proxy. It’s handling the whole site, so the base URI is /. The document root value is usually / unless your custom server needs something different. (For example, PHP-FPM wants the absolute path to your site’s top-level PHP files.) Any port from 1024 to 65535 can be used as long as the same value is used both in our UI and in the configuration of the daemon. We’ll use 8000 for the target port because that’s what Django already said it wanted when we ran it on the ssh server above. And unlike the ssh server, you don’t have to worry about what anyone else is doing. Every site can use whatever ports are needed in this range.
If we wanted Django to handle absolutely the whole site, we’d use the “Direct” option to bypass Apache entirely. That’s faster and scales better, so it’s often a good choice. Our network will still automatically reverse proxy your static content whenever possible, so it doesn’t much matter that Django isn’t optimized for that.
But here we want to exclude the /images/ directory, so it doesn’t get sent to Django. To do this, we’ll leave Direct unchecked, add that proxy, and then go back to the Site Information panel to add a second entry:
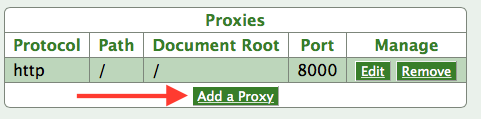
And configure it as a “none” option, which tells our system to send requests for some URLs back through Apache to a directory under public:
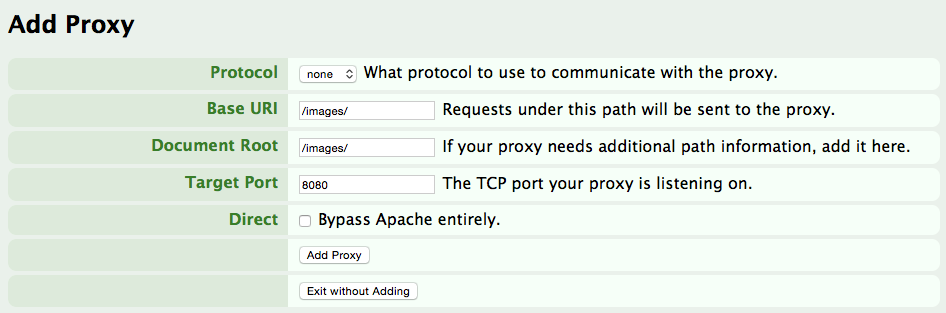
In this case, we want /images/ to point to the “images” directory we created in /home/public way back at the beginning, so both paths will be “/images/” as shown. The port value doesn’t matter for a “none” proxy; and it won’t be used.
D’Artagnan!
Once this is all done, Django is ready to spring into action. Our UI should look like this:
And the live site looks like this:

(Assuming you use an improbably small but conveniently-screenshot-sized browser window. Also note that we served the image above from the django site’s static images directory we set up.)
Of course, when it says “you haven’t actually done any work yet,” it’s understating the case a little. Setting up Django isn’t effortless, but it is pretty easy.
Interacting with your pet Daemon
Now, if we head back to ssh, we can interact with our daemon a bit. First, we’ll check out its output. This is particularly helpful for troubleshooting a run script in case your daemon won’t start.
[django /home/public/images]$ cd /home/logs
[django /home/logs]$ ls
daemon_django.log
[django /home/logs]$ cat daemon_django.log
[16/Nov/2014 22:05:41] "GET / HTTP/1.1" 200 1759
[16/Nov/2014 22:05:42] "GET /favicon.ico HTTP/1.1" 404 1935
[16/Nov/2014 22:33:40] "GET / HTTP/1.1" 200 1759
[16/Nov/2014 22:56:45] "GET / HTTP/1.1" 200 1759
But you can also connect to your daemon if you want.
[django /home/logs]$ curl -i http://django.local:8000/
HTTP/1.0 200 OK
Date: Sun, 16 Nov 2014 23:37:39 GMT
Server: WSGIServer/0.1 Python/2.7.8
Vary: Cookie
X-Frame-Options: SAMEORIGIN
Content-Type: text/html
... blah blah blah ...
This isn’t super-useful for Django, but it’s handy for other processes like databases, so you can connect to them with admin tools. Just change “django” to your actual site’s short name as shown in our UI.
From here, the next step is to create an amazing and cool Django-powered site hosted on our service. That is left as an exercise for the reader.
If you want to learn more about Django, check out the DjangoGirls tutorial. (Also works for boys.) If you’ve done all the steps above, you can try picking up their tutorial here.
That’s it for this intro to the persistent process feature. Next time, Node.JS!
8 Comments
RSS feed for comments on this post.
Sorry, the comment form is closed at this time.
Categories:
- Beta
 (9)
(9)
- Humor (3)
- Miscellaneous (4)
- Network Status (23)
- News & Announcements (76)
- Policy Changes (12)
- Politics & Legal (10)
- Tips & Tricks (7)
- Uncategorized (1)
- Updates & Upgrades (63)
Archives:
- April 2026 (1)
- February 2026 (1)
- September 2025 (1)
- July 2025 (1)
- March 2025 (1)
- May 2024 (1)
- December 2023 (1)
- August 2023 (1)
- July 2023 (1)
- January 2022 (1)
- January 2021 (1)
- December 2019 (1)
- February 2018 (1)
- September 2017 (1)
- February 2016 (1)
- June 2015 (1)
- May 2015 (1)
- March 2015 (1)
- December 2014 (1)
- November 2014 (1)
- September 2014 (1)
- August 2014 (2)
- July 2014 (1)
- April 2014 (1)
- February 2014 (1)
- December 2013 (1)
- September 2013 (2)
- December 2012 (1)
- October 2012 (1)
- July 2012 (1)
- January 2012 (2)
- December 2011 (1)
- November 2011 (1)
- August 2011 (1)
- April 2011 (1)
- March 2011 (1)
- February 2011 (1)
- November 2010 (2)
- July 2010 (1)
- June 2010 (1)
- April 2010 (1)
- March 2010 (2)
- November 2009 (2)
- August 2009 (1)
- July 2009 (1)
- June 2009 (3)
- March 2009 (1)
- February 2009 (1)
- November 2008 (2)
- October 2008 (1)
- September 2008 (3)
- May 2008 (3)
- April 2008 (5)
- February 2008 (2)
- December 2007 (1)
- September 2007 (4)
- July 2007 (1)
- June 2007 (2)
- April 2007 (2)
- March 2007 (2)
- February 2007 (2)
- January 2007 (4)
- December 2006 (1)
- November 2006 (7)
Entries and comments feeds.
Valid XHTML and CSS.
Powered by WordPress. Hosted by NearlyFreeSpeech.NET.
Thanks, this looks really useful! I’ve been wanting to get the new version of my photo gallery off of Heroku (it wasn’t a good fit) and this might be the opportunity to bring it back to NFSN.
Comment by Tim McCormack — November 20, 2014 #
These instructions show how to use the Django development server as the daemon. How do you do this for production?
Comment by Maksim — November 23, 2014 #
Just substitute the server you want to use (gunicorn or uwsgi or whatever) for the development server in the run script. Choices vary widely, are subjective enough to rule out a clear “best” answer, and are not specific to our service, so this article did not cover that. It assumes that if you want that, then it’s familiar ground for you, so you know how to adapt this example accordingly.
Do note that running the “development” server behind our reverse proxies and Apache so that it only gets Django requests, as shown in this article, already addresses most of the arguments against using it in production for many (but by no means all) applications.
Ultimately, we’re not trying to tell Django people how to Django, we’re just showing them how to Django here. Your good judgment should still prevail. 🙂
-jdw
Comment by jdw — November 23, 2014 #
Here’s an example of how difficult it isn’t to switch from the development server to gunicorn, taken almost straight from the Django documentation. (They use a different name for their sample app.)
In the run script shown in this article, change the line:
exec python manage.py runserverto:
exec gunicorn helloworld.wsgiAnd, if the development server is already running, send your daemon a TERM from our UI to restart using the new one. That’s pretty much it.
Of course, there are all sorts of Django and gunicorn settings you can tweak (notably the number of workers/threads for gunicorn and the Debug setting for Django). It’s way beyond the scope of this article to get into that, for the same reason we don’t get into creating applications and all the stuff that comes after getting the server up and running.
(gunicorn and uwsgi are present in the same realms as Django.)
-jdw
Comment by jdw — November 24, 2014 #
I want to take a look at this and couple it with the offer of Postgres I saw in the original announcement of persistent processes.
However often it gets said, it’s not enough: you guys bleedin’ rock. I can’t wait to give this a go.
Comment by BobC — December 8, 2014 #
First, this is great! I’m sure I will be using this at some point. Second, any comment on running Discourse? I’ve noticed it tends to require a bit more hardware than most other software. And it needs at least Ruby 2 (I believe you are on Ruby 1.9?) Thanks again, you guys are awesome!
Comment by Jayshua — December 9, 2014 #
I don’t know if anyone has tried Discourse; “a bit more hardware” would probably translate into “a bit more cost.”
Ruby 2 has compatibility issues and therefore is only available in the black realm, alongside its ne’er-do-well buddy, Python 3.
-jdw
Comment by jdw — December 9, 2014 #
Very much looking forward to the Ruby on Rails article mentioned in the first paragraph.
Comment by nipponese — January 14, 2015 #